| .. | ||
| assets | ||
| README.md | ||
Spark & Reachy Photo Booth
AI augmented photo booth using the DGX Spark and Reachy Mini.
Table of Contents
Overview
Basic idea
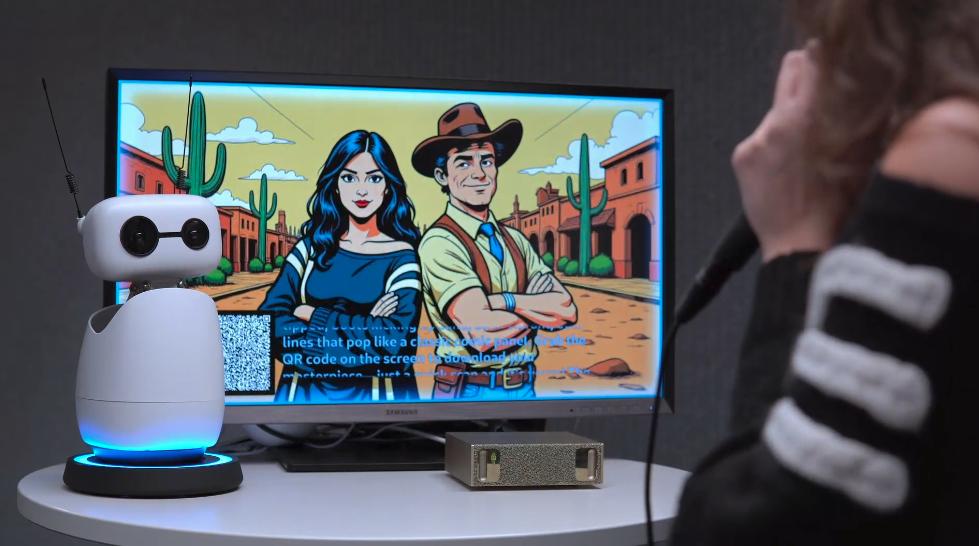
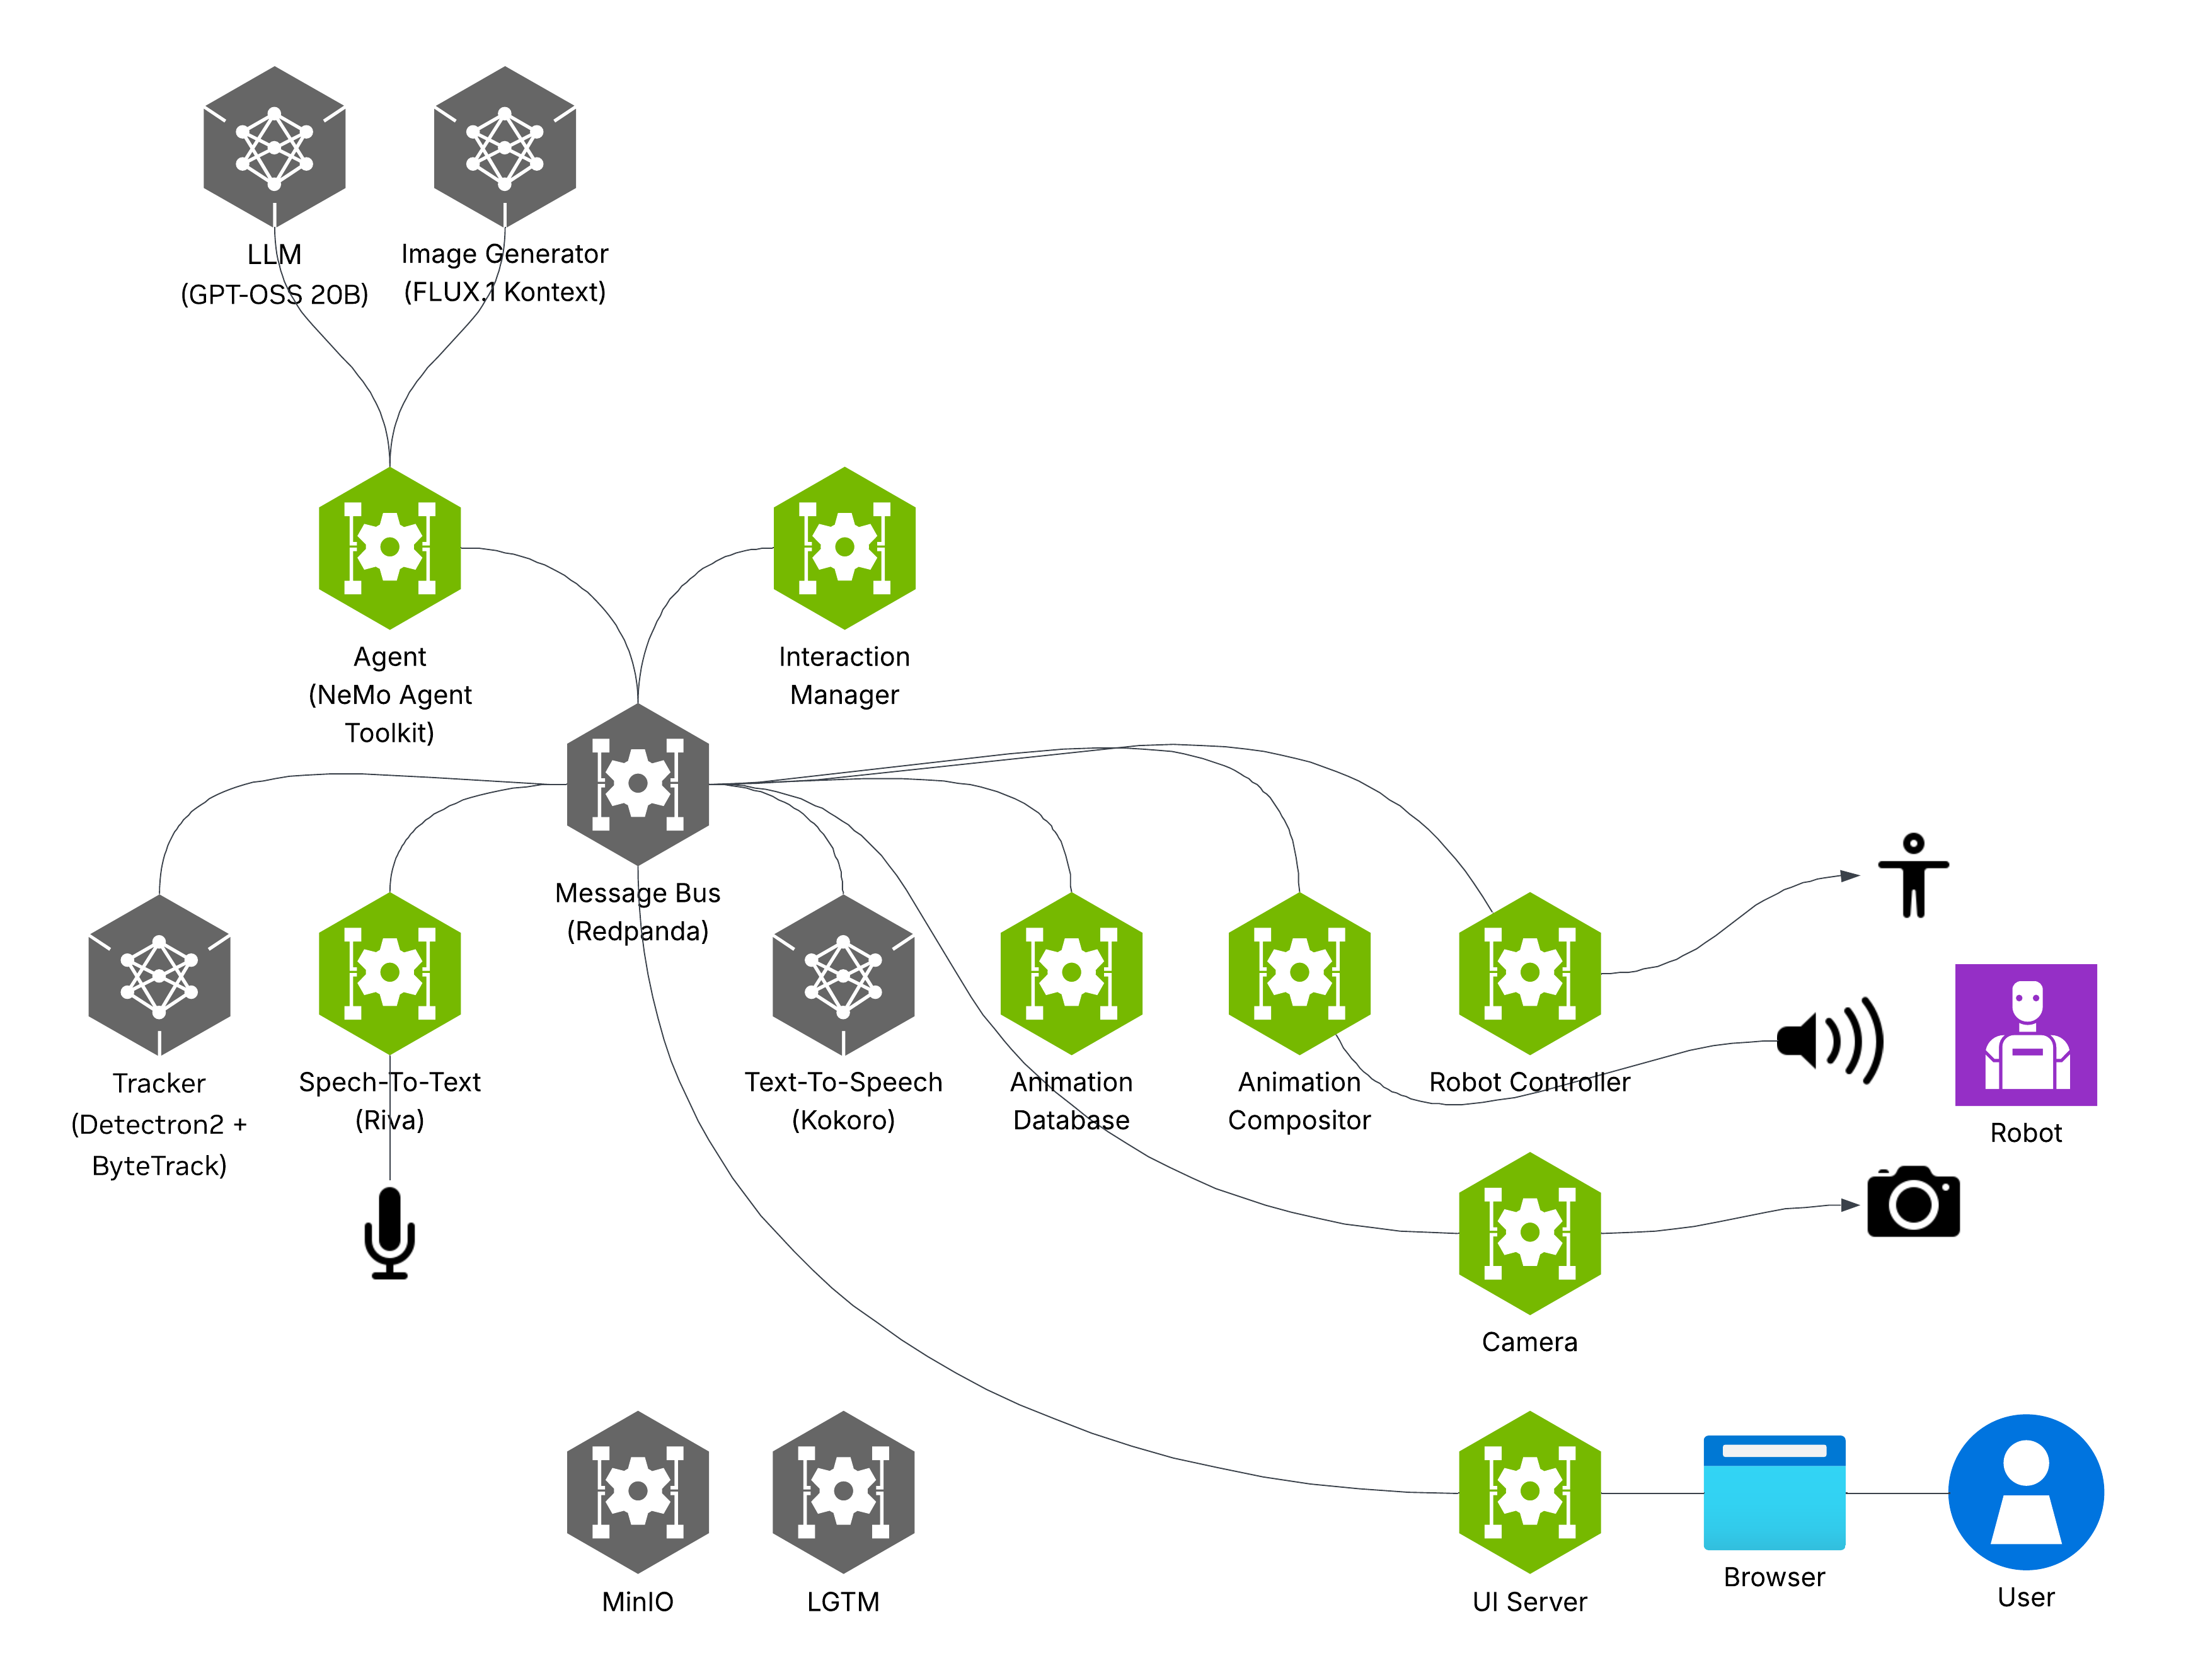
Spark & Reachy Photo Booth is an interactive and event-driven photo booth demo that combines the DGX Spark™ with the Reachy Mini robot to create an engaging multimodal AI experience. The system showcases:
- A multi-modal agent built with the
NeMo Agent Toolkit - A ReAct loop driven by the
openai/gpt-oss-20bLLM powered byTensorRT-LLM - Voice interaction based on
nvidia/riva-parakeet-ctc-1.1Bandhexgrad/Kokoro-82M - Image generation with
black-forest-labs/FLUX.1-Kontext-devfor image-to-image restyling - User position tracking built with
facebookresearch/detectron2andFoundationVision/ByteTrack - MinIO for storing captured/generated images as well as sharing them via QR-code
The demo is based on several services that communicate through a message bus.
See also the walk-through video for this playbook: Video
Note
This playbook applies to Reachy Mini Lite. Reachy Mini (with on-board Raspberry Pi) might require minor adaptations. For simplicity, we’ll refer to the robot as Reachy throughout this playbook.
What you'll accomplish
You'll deploy a complete photo booth system on DGX Spark running multiple inference models locally — LLM, image generation, speech recognition, speech generation, and computer vision — all without cloud dependencies. The Reachy robot interacts with users through natural conversation, captures photos, and generates custom images based on prompts, demonstrating real-time multimodal AI processing on edge hardware.
What to know before starting
- Basic Docker and Docker Compose knowledge
- Basic network configuration skills
Prerequisites
Hardware Requirements:
- NVIDIA DGX Spark
- A monitor, a keyboard, and a mouse to run this playbook directly on the DGX Spark.
- Reachy Mini or Reachy Mini Lite robot
Tip
Make sure your Reachy robot firmware is up to date. You can find instructions to update it here. Software Requirements:
- The official DGX Spark OS image including all required utilities such as Git, Docker, NVIDIA drivers, and the NVIDIA Container Toolkit
- An internet connection for the DGX Spark
- NVIDIA NGC Personal API Key (
NVIDIA_API_KEY). Create a key if necessary. Make sure to enable theNGC Catalogscope when creating the key. - Hugging Face access token (
HF_TOKEN). Create a token if necessary. Make sure to create a token with Read access to contents of all public gated repos you can access permission.
Ancillary files
All required assets can be found in the Spark & Reachy Photo Booth repository.
- The Docker Compose application
- Various configuration files
- Source code for all the services
- Detailed documentation
Time & risk
- Estimated time: 2 hours including hardware setup, container building, and model downloads
- Risk level: Medium
- Rollback: Docker containers can be stopped and removed to free resources. Downloaded models can be deleted from cache directories. Robot and peripheral connections can be safely disconnected. Network configurations can be reverted by removing custom settings.
- Last Updated: 04/01/2026
- 1.0.0 First publication
- 1.0.1 Documentation improvements
Governing terms
Your use of the Spark Playbook scripts is governed by Apache License, Version 2.0 and enables use of separate open source and proprietary software governed by their respective licenses: Flux.1-Kontext NIM, Parakeet 1.1b CTC en-US ASR NIM, TensorRT-LLM, minio/minio, arizephoenix/phoenix, grafana/otel-lgtm, Python, Node.js, nginx, busybox, UV Python Packager, Redpanda, Redpanda Console, gpt-oss-20b, FLUX.1-Kontext-dev, FLUX.1-Kontext-dev-onnx.
Note
FLUX.1-Kontext-dev and FLUX.1-Kontext-dev-onnx are models released for non-commercial use. Contact sales@blackforestlabs.ai for commercial terms. You are responsible for accepting the applicable License Agreements and Acceptable Use Policies, and for ensuring your HF token has the correct permissions.
Instructions
Step 1. Clone the repo
To easily manage containers without sudo, you must be in the docker group. If you choose to skip this step, you will need to run Docker commands with sudo.
Open a new terminal and test Docker access. In the terminal, run:
docker ps
If you see a permission denied error (something like permission denied while trying to connect to the Docker daemon socket), add your user to the docker group so that you don't need to run the command with sudo.
sudo usermod -aG docker $USER
newgrp docker
git clone https://github.com/NVIDIA/spark-reachy-photo-booth.git
cd spark-reachy-photo-booth
Warning
This playbook is expected to be run directly on your DGX Spark and with the included web browser.
Step 2. Create your environment
cp .env.example .env
Edit .env and set:
NVIDIA_API_KEY: your NVIDIA API key (must start withnvapi-...)HF_TOKEN: your Hugging Face token (must start withhf_...)EXTERNAL_MINIO_BASE_URL: leave unchanged, unless you want to (see the section "Enable QR-code sharing on your local network")
To access the FLUX.1-Kontext-dev model, sign in to your Hugging Face account, then review and accept the FLUX.1-Kontext-dev and FLUX.1-Kontext-dev-onnx License Agreements and Acceptable Use Policy.
The remaining values are configured with reasonable defaults for local development (MinIO). For production deployments or untrusted environments, these values should be changed and stored securely.
Step 3. Set up Reachy
- Plug the power cable to the base of Reachy and to a power outlet.
- Plug a USB-C cable to the base of Reachy and to the DGX Spark.
- Engage the power switch at the base of Reachy. The LED next to the switch should turn red.
You can verify that the robot is detected by running:
lsusb | grep Reachy
You should see a device printed in the terminal similar to Bus 003 Device 003: ID 38fb:1001 Pollen Robotics Reachy Mini Audio.
Run the following command to make sure the Reachy speaker can reach the maximum volume.
./robot-controller-service/scripts/speaker_setup.sh
Step 4. Start the stack
Sign in to the nvcr.io registry:
docker login nvcr.io -u "\$oauthtoken"
When prompted for a password, enter your NGC personal API key.
docker compose up --build -d
This command pulls and builds container images, and downloads the required model artifacts. The first run can take between 30 minutes and 2 hours, depending on your internet speed. Subsequent runs usually complete in about 5 minutes.
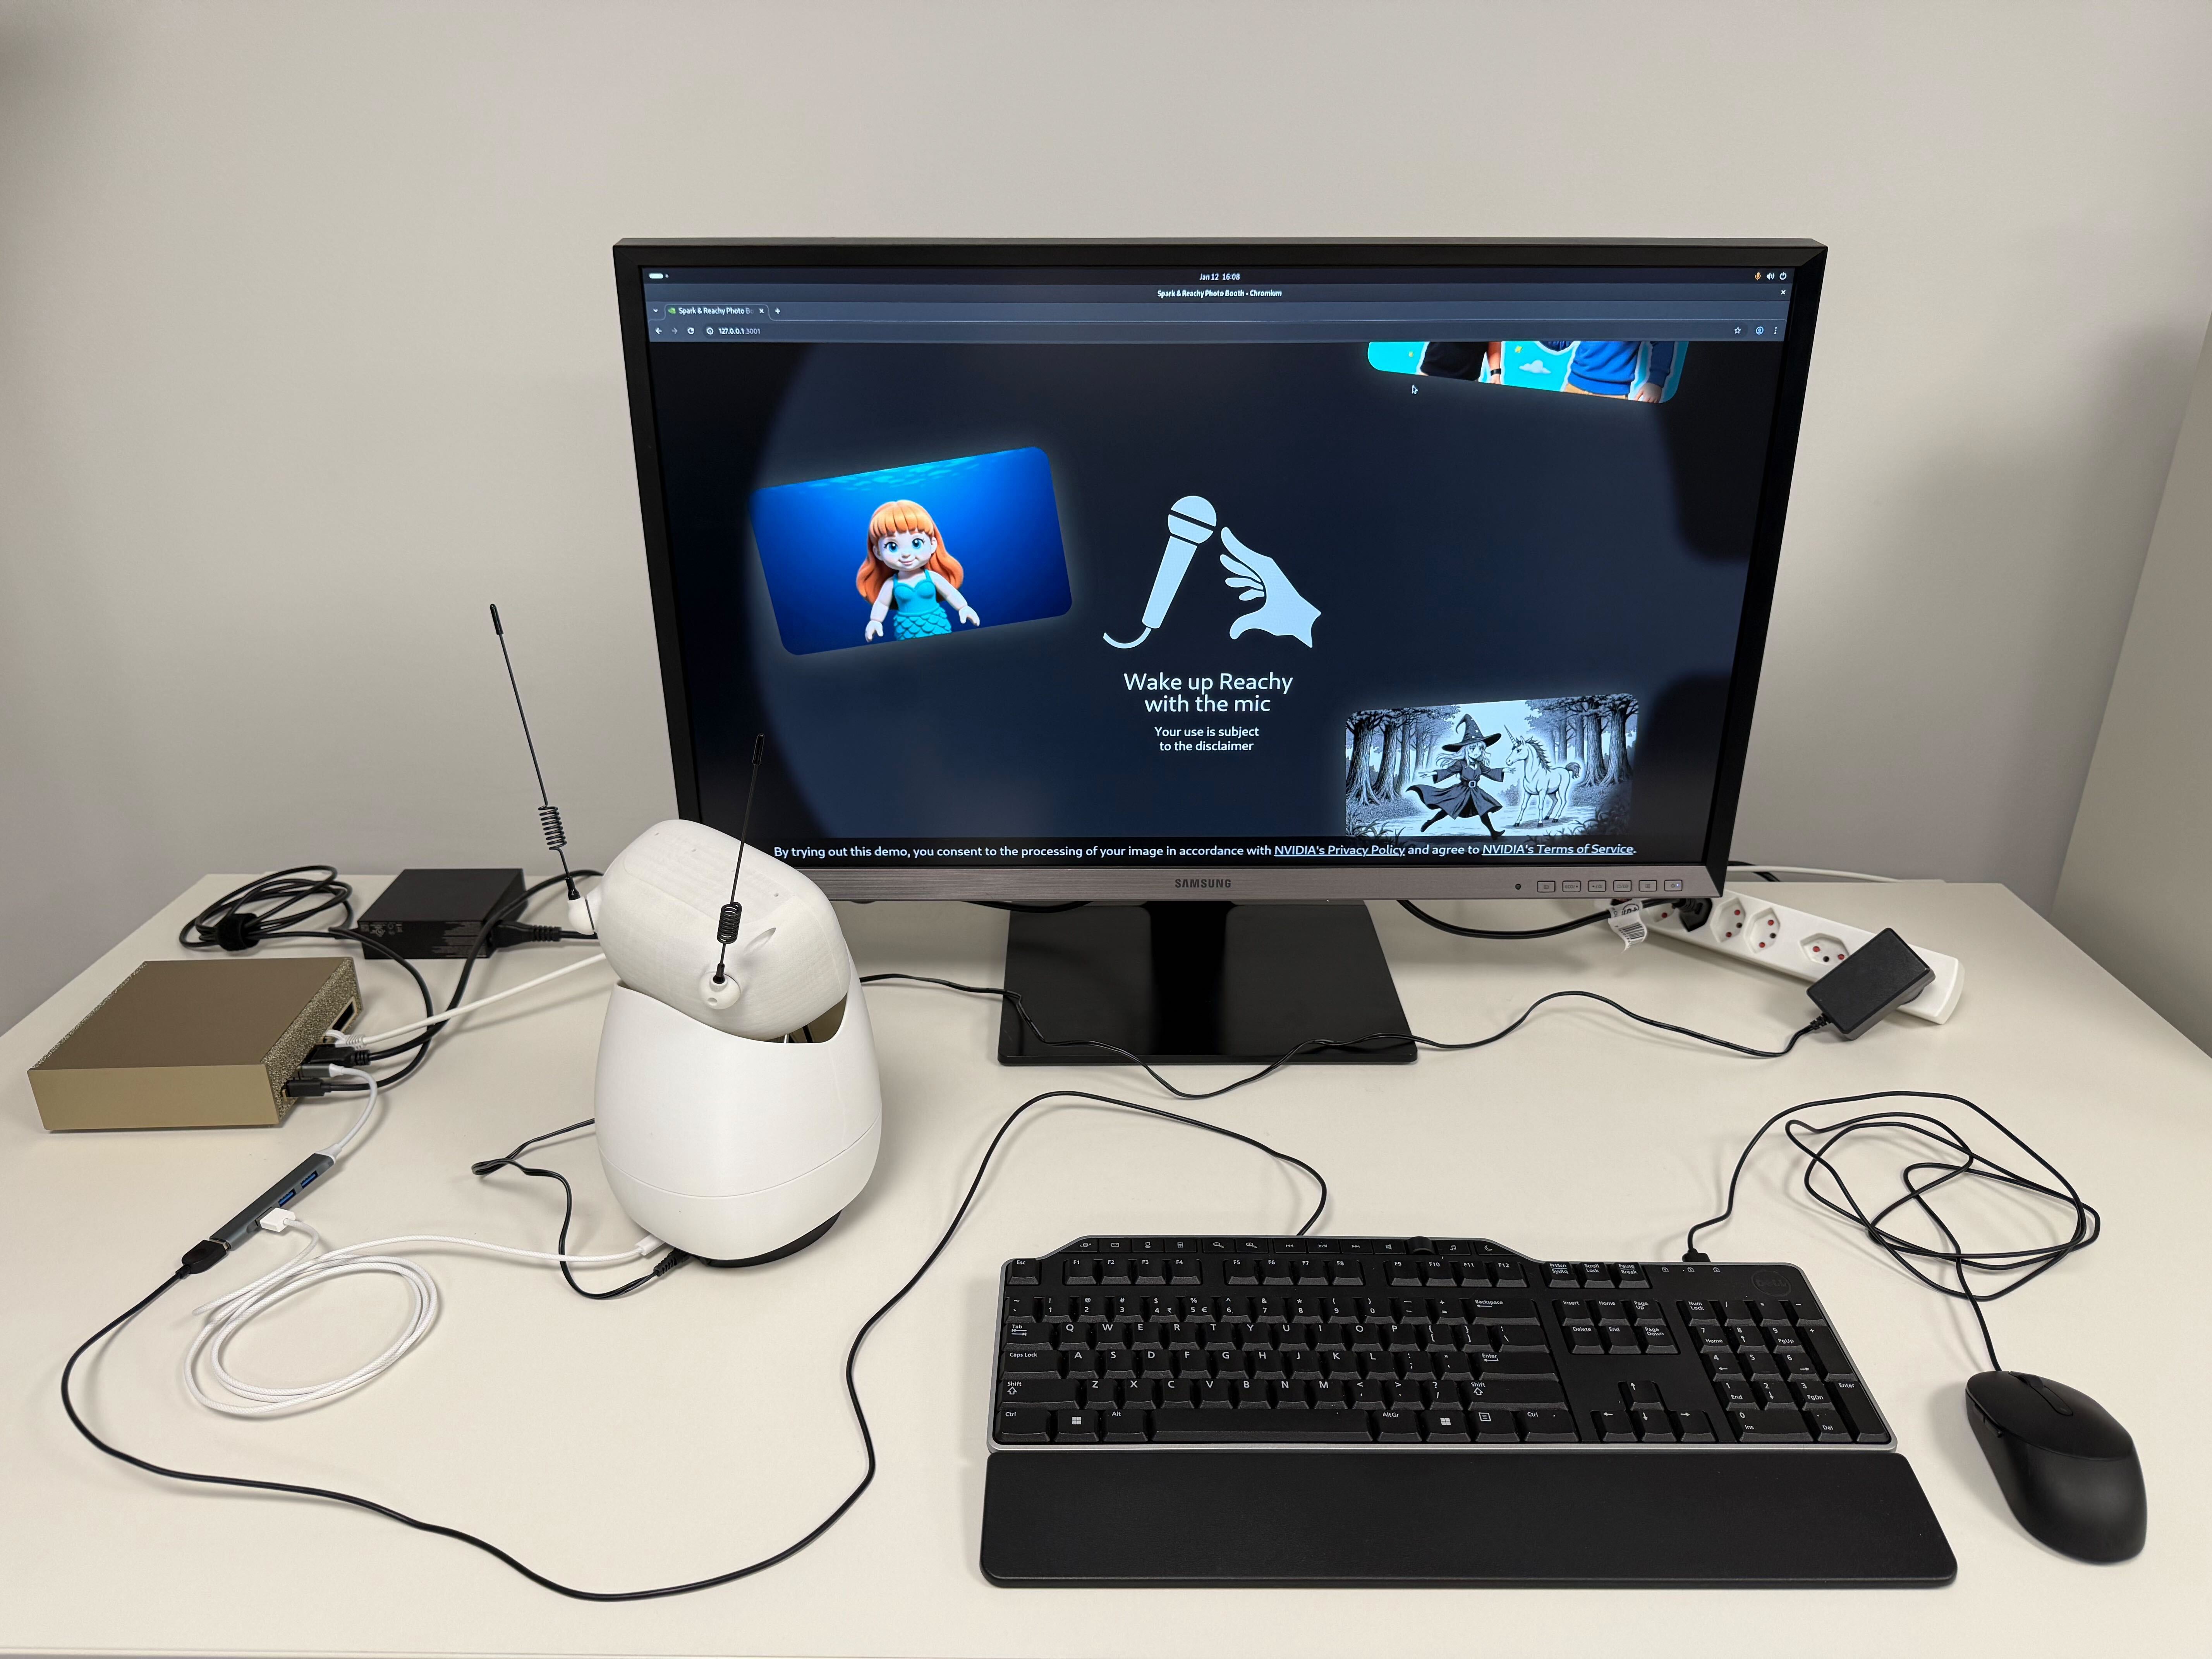
Step 5. Open the UI in your browser
On the DGX Spark, open Firefox (pre-installed) and browse to the Web UI: http://127.0.0.1:3001.
Tip
The Web UI is accessible only when all containers are up and running. You can also check the status of all the containers with
docker compose ps --format "table {{.ID}}\t{{.Names}}\t{{.Status}}". If one or more containers are failing, inspect the logs withdocker compose logs -f <container_name>.
Tip
You can remotely spectate the ongoing interaction by opening an ssh session with X11 forwarding enabled (
ssh -X <USER>@<SPARK_IP>). You should be able to open Firefox from this session and connect to http://127.0.0.1:3001.
Note
The UI has a small impact on the performance of image generation. In order to optimize the performance of the image generation step in the experience, you can install and use Chromium instead of Firefox, as well as reduce the display resolution.
Step 6. Optional: Enable QR-code sharing on your local network
Reachy can take pictures of people and generate images based on them. The web UI displays the generated images along with a QR code for downloading them. This section explains how to set up the system so that the QR code is accessible from users' phones.
For QR codes to open on your phone, your DGX Spark and phone must be on the same local network. Ensure that your router permits device-to-device communication within the network.
1. Find your Spark’s local IP address
On the Spark, run the following command:
ip -f inet addr show enP7s7 | grep inet
Or this command if your Spark is connected through Wi-Fi
ip -f inet addr show wlP9s9 | grep inet
Find the IPv4 on your LAN (often something like 192.168.x.x or 10.x.x.x).
2. Ensure MinIO is reachable from your phone
- Same network: connect your phone to the same Wi‑Fi/LAN as the DGX Spark.
- Firewall: by default, DGX Spark does not block incoming requests. If you installed a firewall, allow inbound traffic to the DGX Spark on
9010(MinIO API).
3. Update .env and restart
Edit .env and replace:
EXTERNAL_MINIO_BASE_URL=127.0.0.1:9010→EXTERNAL_MINIO_BASE_URL=<SPARK_LAN_IP>:9010
Then restart:
docker compose down
docker compose up --build -d
Step 7. Optional: Going Further & Customizing the Application
Guides
- Getting Started – In-depth setup and configuration walkthrough
- Writing Your First Service – How to create and integrate a new service
Service Configuration
Each service has its own README with details on customization, environment variables, and service-specific configuration:
| Service | Description |
|---|---|
| agent-service | LLM-powered agent workflow and decision logic |
| animation-compositor-service | Combines animation clips and audio mixing |
| animation-database-service | Animation library and procedural animation generation |
| camera-service | Camera capture and image acquisition |
| interaction-manager-service | Event orchestration and robot utterance management |
| metrics-service | Metrics collection and monitoring |
| remote-control-service | Web-based remote control interface |
| robot-controller-service | Direct robot hardware control |
| speech-to-text-service | Audio transcription (NVIDIA Riva/Parakeet) |
| text-to-speech-service | Speech synthesis |
| tracker-service | Person detection and tracking |
| ui-server-service | Backend for the web UI |
For detailed guidance on customizing service configurations, extending the demo with new tools, or creating your own services, refer to the Development tab.
Development
Development
This section provides comprehensive instructions for customizing and developing upon the Reachy Photo Booth application. If you're looking to deploy and run the application as-is, refer to the Instructions tab instead — this Development guide is specifically for those who need to make modifications to the application.
Step 1. System dependencies
In order to use the Python development setup of the repository install the following packages:
sudo apt install python3.12-dev portaudio19-dev
To create the Python venv install uv by following the instructions here.
Then run the following command to generate the Python venv:
uv sync --all-packages
Step 2. Get acquainted with the build and development process
Every folder suffixed by -service is a standalone Python program that runs in its own container. You must always start the services by interacting with the docker-compose.yaml at the root of the repository. You can enable code hot reloading for all the Python services by running:
docker compose up --build --watch
Whenever you change some Python code in the repository the associated container will be updated and automatically restarted.
The Getting Started guide provides a comprehensive walkthrough of the build system, development workflow, debugging strategies, and monitoring infrastructure.
Step 3. Make changes to the application
Now that your development environment is set up, here are the most common customizations developers typically explore.
Customize configuration parameters
Each service has configurable parameters including system prompts, audio devices, model settings, and more. Check the individual service READMEs and the src/configuration.py files for detailed configuration options. Note that the default configuration in src/configuration.py might also be overridden in the compose.yaml file. Check out the following services to get started:
- speech-to-text-service - Configure audio devices and transcription settings
- text-to-speech-service - Adjust voice synthesis parameters
- agent-service - Customize LLM system prompts, agent behavior, and decision logic
See the instructions for a complete list of all services and their READMEs.
Extend the demo with new tools
The agent-service and interaction-manager-service are the core services for extending the demo with new capabilities:
- agent-service - Add new agent tools and capabilities here
- interaction-manager-service - Manage event orchestration and robot utterances
Create your own service
The Writing Your First Service guide provides a step-by-step tutorial on scaffolding, implementing, and integrating a new microservice into the system. Follow this guide to create custom services that extend the photo booth functionality.
Troubleshooting
| Symptom | Cause | Fix |
|---|---|---|
| No audio from robot (low volume) | Reachy speaker volume set too low by default | Increase Reachy speaker volume to maximum |
| No audio from robot (device conflict) | Another application capturing Reachy speaker | Check animation-compositor logs for "Error querying device (-1)", verify Reachy speaker is not set as system default in Ubuntu sound settings, ensure no other apps are capturing the speaker, then restart the demo |
| Image-generation fails on first start | Transient initialization issue | Rerun docker compose up --build -d to resolve the issue |
If you have any issues with Reachy that are not covered by this guide, please read Hugging Face's official troubleshooting guide.
Note
DGX Spark uses a Unified Memory Architecture (UMA), which enables dynamic memory sharing between the GPU and CPU. With many applications still updating to take advantage of UMA, you may encounter memory issues even when within the memory capacity of DGX Spark. If that happens, manually flush the buffer cache with:
sudo sh -c 'sync; echo 3 > /proc/sys/vm/drop_caches'
For latest known issues, please review the DGX Spark User Guide.